Hide and Seek – a Scratch and Makey Makey Construction

This one isn’t mine – it was done by a small group of Key Stage 3 (Junior High) girls during a one hour workshop I led earlier this year. This is one of my case studies with examples that we will be looking at in more detail at Scratch in Control. If you haven’t reserved your free place yet, do so now!

Computer Moderated Boardgames

One of the things that students seem to ‘get’ very quickly is that a Makey Makey is really just a cleverly designed switch that you connect to your computer (OK, we all know it’s more complicated than that – but let’s keep things simple). Complete the circuit, and you close the switch. Whatever you’ve told the computer to do when that particular button is pressed, the computer will then do: make a noise, run through an animation, perform a calculation, move a sprite…

So, some people choose to become part of the switch by holding or attaching the earth to themselves. But there are other ways of completing the circuit…

Time for a 2B pencil and some copper conductive tape…

A thick dark graphite pencil trail will conduct electricity. So, we draw two halves of a circuit on some card and connect them to a Makey-Makey. If the lines are close enough, then using your finger to connect them will complete the circuit. For some applications, that’s enough.

But we can do better than that. Other items also conduct electricity – including some metal cans and foil wrapped candy (always worth having stuff like this handy to show off – just make sure you tested it beforehand). However, you can alse design your own buttons or playing pieces and stick a short length of copper conductive tape on the base.

As usual, this isn’t an original idea – I’m sure I read of a virtual zoo game on the Makey-Makey forums where a player who correctly places an animal in its enclosure is rewarded by a short animation.

My challenge to my students is: what kind of boardgame would you produce using Scratch and a Makey Makey?

There is a lot of scope here for what they may want the computer to do for them:

  • Ask random questions when a playing piece lands on a specific square
  • Tell you if an answer was right or wrong
  • Keep track of players’ scores, declaring who the winner is at the end
  • Play an animation/sound if a piece lands on a particular square
  • Keep information hidden that one person inputs, and that others have to discover

They come up with a game board design, cut holes in the card where they want the playing pieces to interact with Scratch, and then draw their circuit on a second sheet which fits under their game board. Design some 3D playing pieces and stick a length to conductive tape to each one’s base, clip the board to the Makey-Makey, write their Scratch code, and the game is ready!

For those teachers who already incorporate a ‘design an educational boardgame’ assignment to their classes, this activity offers an enhancement that may engage some students looking for a different type of challenge. The coding side of things can be as simple, or as complex as they choose to make it. At Scratch in Control, we’ll look at a simple modification that anyone can make to increase the number of possible responses on a game board…

The One Hour Scratch Robot Challenge

One of the topics we’ll be doing a short case study on at Scratch in Control is the place of coding as a problem solving tool in Gifted and Talented provision. To summarise the approach we’ve used successfully: where appropriate, allow for a coded option to stretch G/T students. If you want to know more, either join us at our Scratch Day event in Prague, or buy us lunch

Today, we’ve had a G/T curriculum enrichment day for Junior High (KS3) students. Many of them already have some Scratch experience, but not so much familiarity with control technology. With only an hour, projects needed to be simple I decided that the best approach would be to offer three differentiated challenges.

Level 1: His Master’s Voice

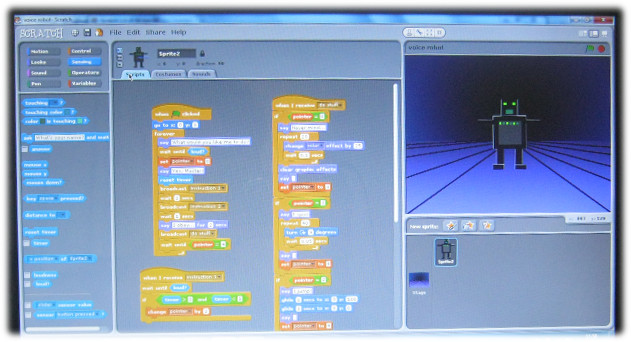
I showed the group a script for a voice activated robot on the screen, by varying the loudness and timing of my commands, it (usually) performed as expected, spinning, jumping and dancing when ordered to. We discussed possible improvements and refinements that they could make if they were to take on this challenge.


Screenshot of a voice activated robot that responds to different commands (most of the time)

Level 2: Make Yourself a Cyborg

I then showed the group my simple Robot of Truth controller, connected to a Makey-Makey. We discussed different user-interfaces that they could draw with a 2B pencil. Some of them had existing projects that they wanted to enhance by making their own custom controllers.

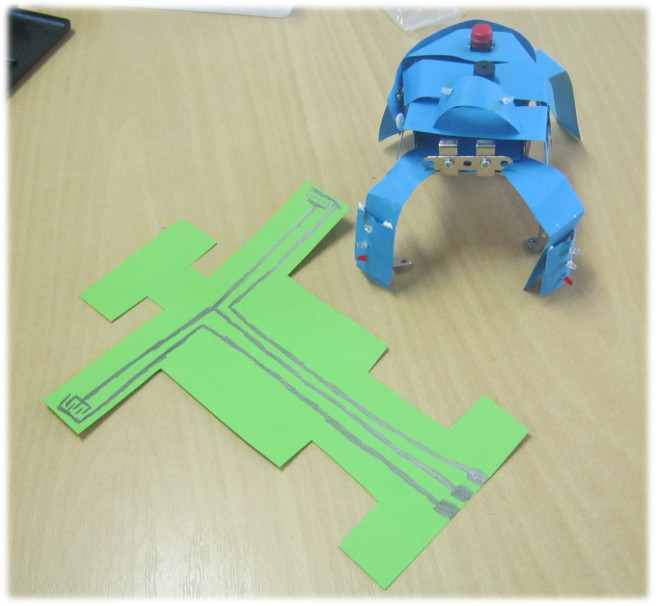
The 2B pencil skeleton of the Robot of Truth – clips attach to the bottom (middle clip is GND/earth). When you touch the left/right hands, it completes the circuit for true/false questions. A Light Louse looks on, bemused by it all…

Level 3: Activate Skynet!

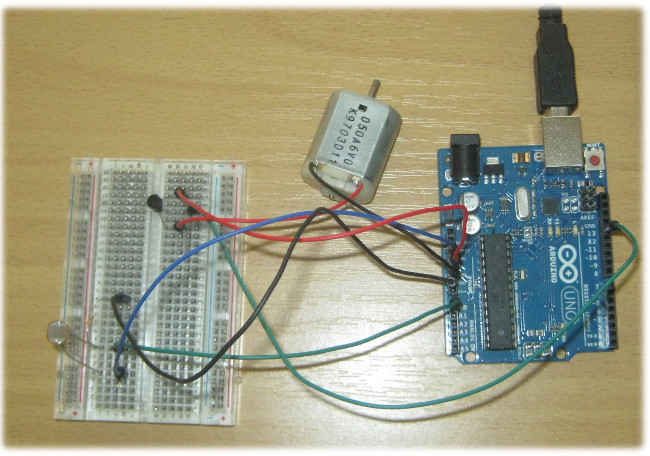
A Makey-Makey will let you easily make almost anything into a button for Scratch, but if you want more options involving both input and output , S4A with an Arduino make a great combination. I set up a simple breadboarded circuit including a light sensor and a DC motor; showing how just a few blocks of code would enable you to use the LDR as a simple proximity sensor to set off the motor. We discussed some possible projects, and I had a couple of students prototyping a contactless game controller and a Rube Goldberg burglar alarm.

An Arduino connected to a light sensor (via a resistor) and a DC motor (via a transistor). When the light sensor is put into shade, the motor starts…

In short, it was a very fruitful afternoon spent with two groups of creative and enthusiastic students.


A Control Cylinder – Because I Can!

Another Makey-Makey project in our series of outrageous user interfaces.

A control cylinder – powered by a makey-makey

This one arose from some discussion in the wake of the ghost controller. I have a student who is thinking about what sort of user-interface you could build for exploring a 3D environment with a Makey-Makey.

You can see where this is going – tune in next week for the washing-up glove of power,,,

One of the possibilities we discussed was having an object to grip – like a baton. This could incorporate a glove, but I decided to have a go with recycling some packaging foam and a cylindrical tube more commonly used for holding stackable cruchy potato-based snacks…

I’ve taken several shots of the process, so I will put them together as a slideshow later. But the photo aboves should give a reasonable idea of how it’s put together. First I drew an outline of my hand on card to position where the buttons for each finger should go.

On this card, I used a 2B pencil to draw the circuit for my buttons – testing each location with a piece of card which had conductive tape attached to it. I then took another card, slightly thinner – and cut out holes to eexpose only the button areas. On the surface of this, I added the foam packaging to raise the card/conductive tape top half of the button above the graphite part.

As a mechanism, the buttons work reasonably well when everything is in place.

The card layers were then stuck round the outside of the cylinder and clipped to the makey-makey. A simple Scratch script was used to test the device.

Refinements

I think a redesign of the graphite side of the buttons could improve the responsiveness of the cylinder. Also, the layout for the buttons is for a hand resting on the cylinder. Next time, I shall design for the hand to be gripped round the baton.

It would be possible to add extra features. This one used four fingers for up/down/left/right and the thumb to emulate a mouse click. It would also be possible to add a tilt switch mechanism for the device.