One thing I started last year, which has worked well for us is a Monthly Scratch Challenge!
Usually, I get the inspiration from discussion in class, when a student says something like, “Wouldn’t it be great if…”
This month, the inspiration comes from the Secretary of State for Education in England. I told my class about the way my Twitter feed transmogrified into the Roger Hargreaves appreciation society in the wake of the debate he has stimulated, and the link one colleague had shared to a Mr Men avatar generator – as an example of a Twitter-based PLN providing access to ideas and resources you might never have the time to uncover on your own.
“But I’m not that impressed,” I said. “It has potential, but I wouldn’t have done it that way!” And so, the challenge was set. If you had to make your own avatar generator, what features would you include?
My initial proof of concept is pretty rough round the edges. Certainly, it makes plenty of random Mr Men-style avatars I can screenshot and use as sprites in another application – but I’m sure my students can do better.
If you would like a year’s supply of monthly Scratch Challenges, and you’re in Prague this weekend, you’re more than welcome to pop in to Scratch in Control – our free Scratch Day event.
I’m starting to plan a follow-up event on November 30, as our contribution to European Robotics Week. If you would like to know more, drop me a line….
It’s human nature, as old as the Bible (see 1 Kings ch.18 for an example). When faced with totalitarian despotism, we respond with a joke. We ridicule what we fear. Michael Gove (UK Secretary of State for Education) fears that history courses could be dumbed down if teachers focus on empathy rather than facts, so he pokes fun at one attempt to encourage students to re-write the story of Hitler’s rise to power for a much younger audience. Those who fear that an overemphasis on history as a factual narrative leaves little time for analysis in turn lampoon Michael Gove as a Roger Hargreaves character. Needless to say, Russel Tarr’s response is much more measured and well thought out. I decided to wait until reading his reply before posting my contribuition to the debate…
Like Michael Gove, I too am no expert on the Mr Men and the Little Misses – although my daughter once created her own hilarious Scratch homage to the Mr Rude “Pull mah fingeurrr” interactivity that used to reside on Channel 5’s Milkshake pages. However, his concerns strike a chord with one activity I do in class which leans heavily on popular culture, for which I would publicly like to apologise in advance to the wider educational community, just in case Mr Gove learns about it…
What follows isn’t a new illustration. I even shared it with the teachers at the Google Apps for Education Summit in Dubai earlier this year to make a point.
There is one thing I have noticed over the years. Many students cannot draw using a computer. There are two main reasons for this:
There’s a steep learning curve – or as one student put it, after a month of working with Inkscape. “All those lessons, and I can now produce something that looks like a three-year-old drew it!” With limited time available, and with the ever-present need to produce instant, high-quality results, it’s no surprise that precious curriculum time isn’t usually devoted to vector graphics applications.
Instead, we turn to the range of excellent image search tools created by Google, and hopefully find time to teach the students about derivative works, attribution of sources, Creative Commons licensing and fair use.
But this isn’t the only way to get hold of a digital image. Often, when I want cartoon-style images of people for work in Scratch, I’ll use a South Park style avatar generator. There are plenty around. I usually use www.sp-studio.de for mine. As there’s always potential for cyberbullying if you give students a completely free choice of subject, I usually choose a theme for my students to investigate. If you would like to see my example Oliver! or Wizard of Oz sprite collections, I’m happy to share. So, I’ve seen my fair share of totalitarian dictators reduced to a two-dimensional cartoonification.
When introducing game design as a coding task in Scratch, one thing I warn other teachers about is the temptation to say to a class, “Just produce an educational game to show me what you’ve learned,” with little or no guidance. When I do this unit with my Year 8 students, we document our research and justify our choices long before we even start to think about coding. I have even gone so far to upload this version of what notto do that I share with teachers:
Ra-Ra-Rasputin – the game!
Yes, you have to use the arrow keys to move Tsar Nic around the stage while he is followed by the mad monk himself. If Rasputin touches Nic – the game’s up and Nic dies. If Nic can get Rasputin to move over the bullet, bomb and poison, then Nic wins.
You can see where this is going. Any time now, I expect an announcement along the lines of, “And so-called Computer Science teachers also ride roughshod over the History curriculum in their feeble attempts to make their subject appear ‘with it’. Why only yesterday, I was shown an example of an interactive cartoon version of the story of Rasputin in the style of South Park that bears little resemblence to the actual facts.”
If that does happen, remember, you read it here first. It’s my parody of a parody.
Now, obviously, if you want to learn more about the way I actually teach my educational game authoring unit, there’s still time to register for Scratch in Control in Prague on May 18.
Multiplo was developed by teachers for teachers. I came across it via their kickstarter crowdfunding campaign and liked what I saw. The philosophy is simple enough, produce an integrated, but flexible model for a wide range classroom robotics projects which is accessible to a wide range of students through a visual programming environment.
It’s open source. To me, that’s a great plus, as it means that you can make additional custom parts if/when the need arises. To find copies of the documentation, construction guides and a helpful forum, you can visit the multiplo website.
The kit I ordered uses a custom, modified Arduino, with a power management module added to enable the motors to run from the same board with little extra power. In theory, you could use the mechanical parts with your own electronic components and an Arduino.
The kit also comes with Minibloq – a visual programming tool, similar in philosophy to Scratch, but with more of a learning curve. My robotics club started with the octagonal robot design, adapting it to support a papier mache shell; and wrote the code to create a photophobic penguin.
The robot waddled about, moving away from lit areas, seeking somewhere dark to hide. Putting it in the school library, it moved into the computer lab, where we had switched the lights off, and sought refuge in the shadows under the table there…
So, my Makeblock kit arrived, I collected it from my local post office on the day after my birthday. I downloaded the list of parts and the Arduino libraries from the Makeblock website and tested it. The next day, I built a simple robot in under half an hour.
So, what is Makeblock?
It’s an open source hardware platform for robotics. It also has a custom shield for easily adding sensors, motors and other devices to it. In theory, it should also integrate with Lego. I’ll let you know how that works out later.
I obtained mine through Makeblock’s kickstarter project. There are a few European suppliers who will stock different sets, or, in theory, you could download the plans and make your own.
The hardware is aluminium (that’s aluminum for our American readers), with a cleverly thought out system of holes and grooves to hold things securely in place.
The kit I received also includes two motors and an IR sensor with a remote control (you can see where this is going). In addition to that, there were also an Arduino and a custom shield with colour-coded sockets for different devices to be connected via RJ11 cables.
The libraries come with sample code, so it’s easy enough to adapt them to make your own custom sketches. Plugging the Arduino with its custom shield in to S4A to make a Scratch-based tethered robot would require significant additional work – . However, as a basis for construction projects using your own kit, it has potential.
Earlier in the school year, I came across two exciting kickstarter projects.
If you’ve never come across crowdfunding before, it’s well worth browsing through both kickstarter and indiegogo to get a feel for the range of projects and the level of enthusiasm of both the starters and backers. I’ll do a separate post on the topic of crowdfunding later.
Both the projects offered a low-cost, affordable route into Arduino-based robotics development that teachers might want to investigate. What grabbed my attention however, was that both projects were also open source. In other words, if you find you’re short of a part, you can download the plans and quickly fabricate a replacement. No need to worry about license fees or buying a much larger expansion kit. If you need to, you can modify the original file and print/burn your own custom parts; share your ideas over the internet and not worry about an angry solicitor’s letter dropping through your letterbox.
That, to me is far more revolutionary than designing a gun.
The two products were Multiplo and Makeblock. Each one deserves a post in its own right. Both have their fair share of advantages and disadvantages.
I’ll have a set of each out on display for teachers to play with at Scratch in Control on May 18. If you’re looking for a cheaper alternative to Lego as a robotics platform that integrates with Arduino, come along and experiment!
Thinking of candy bands and tortillaphones has made me hungry.
As far as the catering is concerned for Scratch in Control, I’m planning on serving wraps and puff-pastry parcels, along with a few other savoury nibbles and salad to garnish. We’ll make sure there’s a vegetarian option available (not just a few hunks of bread and cheese with a lettuce leaf – more likely a vegetable korma wrap). If there’s a sudden surge in demand for tickets, we’ll also supply clebichek (Czech open sandwiches) and pizza.
Obviously, I don’t expect someone to be looking at this and saying, “Wow, curry in a wrap, I must get my free ticket now!” But the catering for any event, no matter how big or small shouldn’t be an afterthought.
And remember, if you can’t make it; but would like copies of our resources. Why not offer to pay for our lunch via our Indiegogo campaign…
This one isn’t mine – it was done by a small group of Key Stage 3 (Junior High) girls during a one hour workshop I led earlier this year. This is one of my case studies with examples that we will be looking at in more detail at Scratch in Control. If you haven’t reserved your free place yet, do so now!
Computer Moderated Boardgames
One of the things that students seem to ‘get’ very quickly is that a Makey Makey is really just a cleverly designed switch that you connect to your computer (OK, we all know it’s more complicated than that – but let’s keep things simple). Complete the circuit, and you close the switch. Whatever you’ve told the computer to do when that particular button is pressed, the computer will then do: make a noise, run through an animation, perform a calculation, move a sprite…
So, some people choose to become part of the switch by holding or attaching the earth to themselves. But there are other ways of completing the circuit…
Time for a 2B pencil and some copper conductive tape…
A thick dark graphite pencil trail will conduct electricity. So, we draw two halves of a circuit on some card and connect them to a Makey-Makey. If the lines are close enough, then using your finger to connect them will complete the circuit. For some applications, that’s enough.
But we can do better than that. Other items also conduct electricity – including some metal cans and foil wrapped candy (always worth having stuff like this handy to show off – just make sure you tested it beforehand). However, you can alse design your own buttons or playing pieces and stick a short length of copper conductive tape on the base.
As usual, this isn’t an original idea – I’m sure I read of a virtual zoo game on the Makey-Makey forums where a player who correctly places an animal in its enclosure is rewarded by a short animation.
My challenge to my students is: what kind of boardgame would you produce using Scratch and a Makey Makey?
There is a lot of scope here for what they may want the computer to do for them:
Ask random questions when a playing piece lands on a specific square
Tell you if an answer was right or wrong
Keep track of players’ scores, declaring who the winner is at the end
Play an animation/sound if a piece lands on a particular square
Keep information hidden that one person inputs, and that others have to discover
They come up with a game board design, cut holes in the card where they want the playing pieces to interact with Scratch, and then draw their circuit on a second sheet which fits under their game board. Design some 3D playing pieces and stick a length to conductive tape to each one’s base, clip the board to the Makey-Makey, write their Scratch code, and the game is ready!
For those teachers who already incorporate a ‘design an educational boardgame’ assignment to their classes, this activity offers an enhancement that may engage some students looking for a different type of challenge. The coding side of things can be as simple, or as complex as they choose to make it. At Scratch in Control, we’ll look at a simple modification that anyone can make to increase the number of possible responses on a game board…
You’ve heard your parents say, “Don’t play with your food!” If you’re a parent, you’ve probably said it yourself, even if you vowed a million times that you would never turn into a carbon-copy of your parents…
The Makey-Makey changes all of that. Most food is conductive – so what you eat, can become a button to click…
One of my GCT colleagues recently released this short instructional video on the art of making marshmallows talk.
I had to respond by releasing this footage shot earlier this year:
and
enjoy…
Those of you who want to see a performing candy band in action – come to Scratch in Control
During our Gifted and Talented day, one of the project ideas proposed by a student was a no-touch game paddle using light sensors to detect when a hand is placed over one side of a controller, putting it in partial shade.
Of course, I like this idea so much, I’ve decided to steal it and build a prototype of my own.
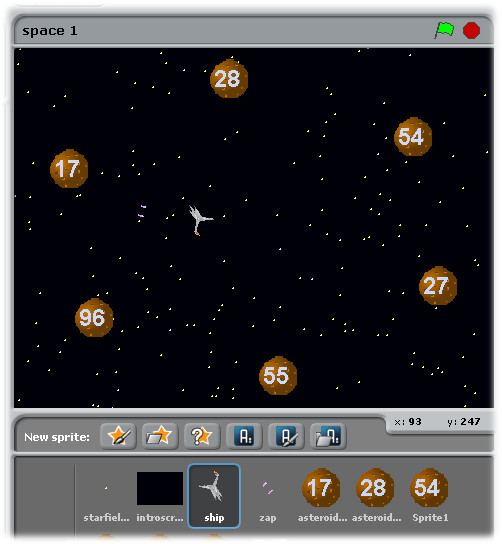
First of all, I needed a Scratch game in S4A that would suit this type of interface. So, I wrote one – a simple space game which included left and right thrusters as well as a missile to fire.
Screenshot of the finished game. The numbered asteroids move in an elliptical path while you fly around, wrapping if you exit the screen, trying to shoot the things
Next, I needed some components – one R/G LED and two light dependent resistors. Cost of parts: about the equivalent of US$2.
I also needed a design for the controller – I used Scratch to draw me a net
The net for my controller – all I needed to do was screenshot, crop and enlarge it before printing…
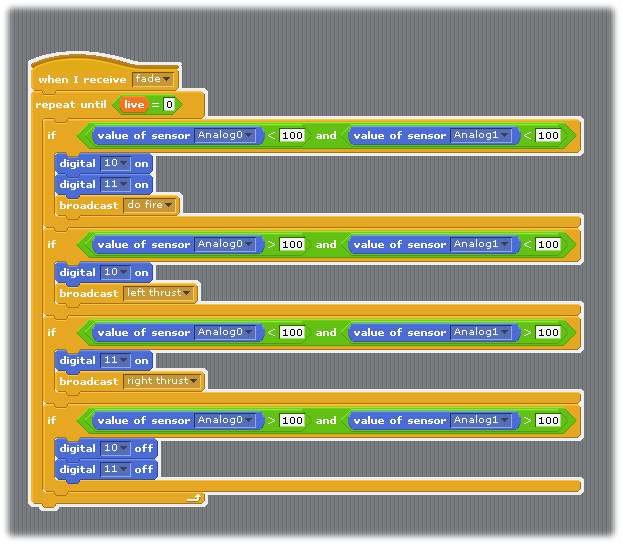
Having printed this out on card, all I had to do was cut it out, make some holes in it for the components to be inserted through and use some conductive tape to give me a base to solder them to some jumper wires. I then plugged these into an Arduino, added some blocks to enable the Arduino to communicate with the program
The analog inputs are for the two light sensors – the digital outputs are for the red and green components of the LED.
..and played the game.
You move your hand close to the left light sensor to switch on the left thrust motor – this rotates the ship to the right as it moves through space. If you do the same with the right, the right hand thruster rotates the ship anticlockwise. Put both in the shade, and the ship fires a purple pulse torpedo. To tell you what’s going on, an indicator light flashes red, green or yellow on top of the controller.
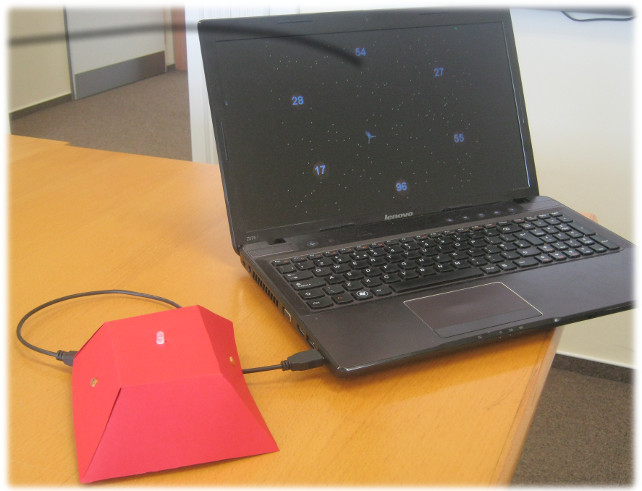
The controller connected to a laptop running the game in presentation mode…
Yes, it’s just another bizarre user interface – but far simpler to make than you might think. What sort of games would you make with it?
I’m planning to distribute more detailed instructions for this – and similar – construction projects for teachers who want to get their hands dirty at Scratch in Control. Obviously, this might not be the sort of task a beginner would choose to do – it involves a little bit of soldering for a start. But, if it’s something you’ve always wanted to try out in a safe and encouraging environment; and possibly win a prize – then come and join us in Prague on May 18.